Let's give Azure Data Explorer Kusto emulator a spin in WSL
The Kusto emulator was released back in September 2022. Encapsulating the Kusto Query Engine and making it available on local compute in a Docker Container. Until June 2023 the emulator was only available as a Windows Container. Now that Microsoft have announced general availability of the Linux Kusto emulator, let’s give it a spin in WSL.
First we’ll have a quick intro on what is Kusto emulator, then we’ll have a look of WSL configuration needed and installing Docker. After that we’ll be able spin up the emulator docker image. Finally we’ll test that the emulator works as expected by running some queries.
Let’s get to it.
What is Kusto emulator?
Kusto emulator is local environment that encapsultes the Kusto Query Engine (more on EngineV3). Currently available as a Windows and Linux Docker image. Note that the emulator is intended for development only. You shouldn’t be running it in production!
And because it’s intended for local use, it also means that you don’t need to provision anything Azure. So, it’s “free”. As if anything is :). By the way, you can also run free ADE clusters with some feature limitations.
When running, the emulator exposes a http endpoint that can basically be used by any client. There’s no support for ingestion endpoints, thus streaming ingestion is impossible. But we can ingest data from local files, external tables and external data using ingestion commands.
More details in MS Learn documentation.
Setting up WSL and installing Docker
I’m not going to go into details on what is or how to install WSL, there is a good and detailed documentation from MS for that already. Most probably you can run wsl.exe --install as an admin on your Windows machine, if you don’t have WSL at all. It should install everything you need. Installing a distro happens when you run wsl.exe --install --d <distroname>. Default distro is Ubuntu, which I happen to have on my machine as of now.
Docker installation, post-installation and validation tasks are easy as running the following commands. In the first line we are installing docker. On the second line we are adding the current user to docker group, so that we don’t need sudo docker everytime. Third line activates the changes to group, so there shouldn’t be a need for a restart. On the last line, we are checking that docker works.
$ sudo apt install docker.io -y
$ sudo usermod -aG docker $USER
$ newgrp docker
$ docker --version
If you are getting errors about that docker daemon cannot be connected, let’s make sure systemd is enabled. While inside the WSL distro, let’s edit /etc/wsl.conf file by running sudo nano /etc/wsl.conf. Add the following configuration to the file and close the editor.
[boot]
systemd=true
Finally we need to restart the WSL, by running wsl.exe --shutdown on the Windows machine. At this point we should be able to run docker --versionsuccesfully.
Spinning up the emulator
Now that we have the prerequisites in place, we can spin up the emulator, by running docker run -e ACCEPT_EULA=Y -m 4G -d -p 8080:8080 -t mcr.microsoft.com/azuredataexplorer/kustainer-linux:latest. It will take some time. Once everything is downloaded we can check the container is running by using docker ps. There should be one in the list matching mcr.microsoft.com/azuredataexplorer/kustainer-linux:latest. We can also see that it has exposed port 8080.
Let’s verify that the emulator is actually working. We can use for example curl.
$ curl http://localhost:8080/v1/rest/mgmt -H 'Content-Type: application/json' -d '{"csl":".show cluster"}'
It will spit out a long json-string. If you want to have it in a bit more readable format, you can append | jq to the end of the last command. It’s not so fun to work with the emulator using curl, so let’s use Kusto.Explorer, which can be downloaded and installed through https://aka.ms/ke. We can add a new connection from Connections tab or by using Insert button on the keyboard.
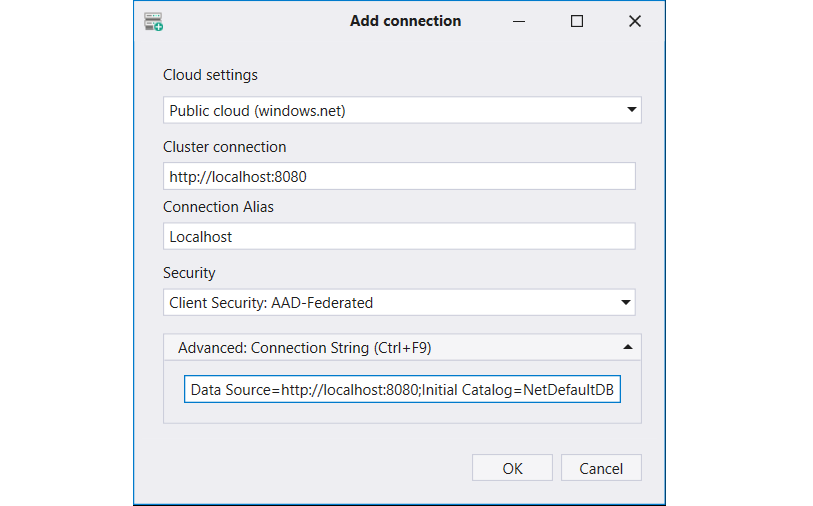
Make sure you use http://localhost:8080 for cluster connection (yes http, not https) and remove AAD Federated Security=True from the connection string.
We could now use some basic commands. For example to create a new database in the container’s RAM, we can use .create database <database-name> volitale, to create a table .create table mytable(Name:string, Id:int) and to ingest data from a local .ingest into table mytable(@"/my-data-file.csv").
But we are going to try and use something else this time. Let’s try with Kusto Detective Agency’s data set (Season 2 Onboarding case).
.execute database script <|
// Create a table for the telemetry data:
.create table DetectiveCases(Timestamp:datetime, EventType:string, DetectiveId:string, CaseId: string, Properties:dynamic)
//clear any previously ingested data if such exists
.clear table DetectiveCases data
// Load the data:
.ingest async into table DetectiveCases (@'https://kustodetectiveagency.blob.core.windows.net/kda2start/log_00000.csv.gz')
.ingest async into table DetectiveCases (@'https://kustodetectiveagency.blob.core.windows.net/kda2start/log_00001.csv.gz')
.ingest into table DetectiveCases (@'https://kustodetectiveagency.blob.core.windows.net/kda2start/log_00002.csv.gz')
No matter how hard I try to ingest data using the ready made script, I just can’t get the data ingested into the emulator’s database. I’m only greeted with the following error message: “Failed to download blob: The SSL connection could not be established, see inner exception.” When trying to ingest the same data using local files, I end with a new error message “Download_SourceNotFound: File path had no files to ingest”, but with the same end result. Nothing gets ingested.
Ok, time to try something else then. The first error message tells that SSL connection could not be established. Let’s try http then. So, let’s create a Azure Storage Account and disable the requirement for secure transfer. I’ll upload the data files into a container with access level set to Blob (anonymous read access for blobs only). Let’s see what happens when ingesting data using http.
// Load the data:
.ingest async into table DetectiveCases (@'http://desperatelytrying.blob.core.windows.net/kusto-detective-season2/log_00000.csv.gz')
.ingest async into table DetectiveCases (@'http://desperatelytrying.blob.core.windows.net/kusto-detective-season2/log_00001.csv.gz')
.ingest into table DetectiveCases (@'http://desperatelytrying.blob.core.windows.net/kusto-detective-season2/log_00002.csv.gz')
And guess what? It works.
Running some simple queries to get a sense how the emulator performs
Let’s run few simple commands and see how the emulator works. Let’s first count the total amount of rows and then have a quick peek of the data.
DetectiveCases
| count

DetectiveCases
| limit 500
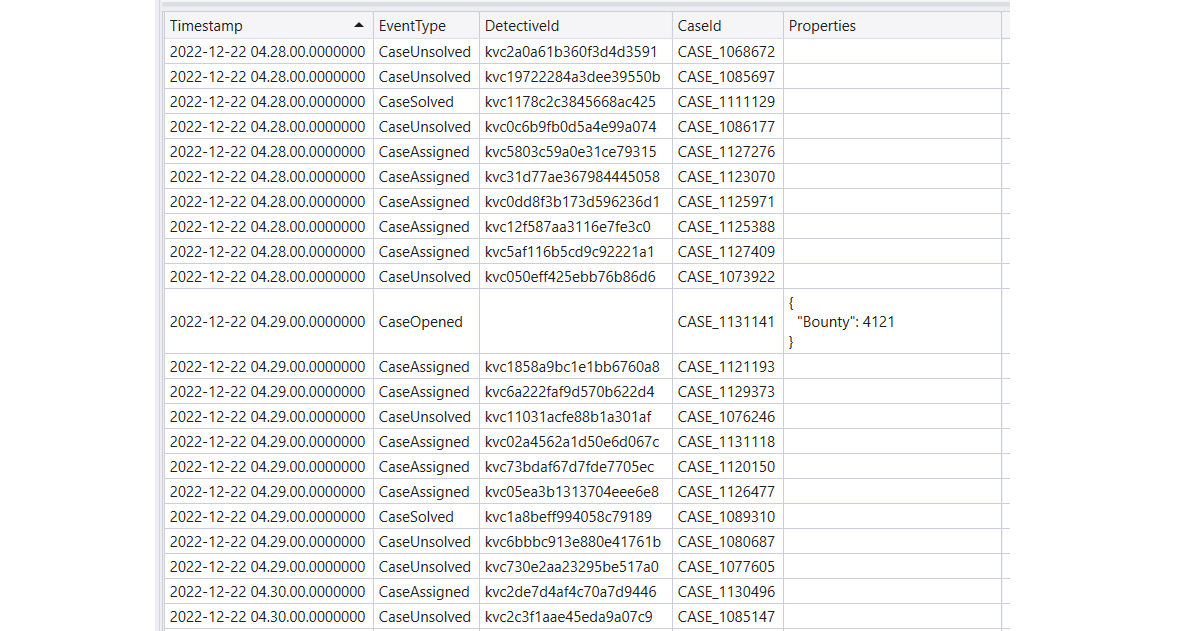
We can see that there are detectives represented by their DetectiveId. We can also see that there exists few event types for a case. We can find the different events with the following query.
DetectiveCases
| distinct EventType
Looks like there are four event types (CaseOpened, CaseAssigned, CaseSolved and CaseUnsolved). From the sample we can also see that a case gets set a Bounty at CaseOpened event. Actual value in Propertied-column inside a json-string. We could get the actual value using for example parse_json()-function (docs).
Let’s have a look of the CaseSolved cases.
DetectiveCases
| where EventType == "CaseSolved"
| order by CaseId asc
How about CaseUnsolved cases, or if we want to see which detectives were assigned to which cases?
DetectiveCases
| where EventType == "CaseUnsolved"
| order by CaseId asc

DetectiveCases
| where EventType == "CaseAssigned"
| order by CaseId asc
We can see that a case can have more than one detective, which is pretty obvious I suppose. We might come to a conclusion that the bounty gets split between all the assigned detectives. Or maybe it’s only split between the detectives that solve the case?
But let’s just stop here as I don’t want to spoil anything. Go and join the agency and solve the onboarding case by answering the following question: Who is the detective that earned most money in 2022?.
Once you provide the correct answer, you’ll get a shiny new badge (credly) like this.
![]()
Before heading out to solve some of the other cases and to achieve rank promotions on the Detective agency, I’ll run few more queries. This time adding the month of year and summarizing the data by month.
DetectiveCases
| where EventType == "CaseSolved"
| extend month=monthofyear(Timestamp)
| summarize casesSolved=count() by month
| order by month asc
How about we add cumulative sum?
DetectiveCases
| where EventType == "CaseSolved"
| extend month=monthofyear(Timestamp)
| summarize casesSolved=count() by month
| order by month asc
| extend cumulativeCaseSolved=row_cumsum(casesSolved)
Running nicely under a second.
Final words
In this blog post I demonstrated how to prepare WSL for running Kusto emulator. We then took it for spin and finally found a way to ingest data into the database. Finally we ran some queries to see that the emulator works. At least all the simple queries I ran during my tests performed well. Some took few seconds and some were done in a split second.
Wish you luck cracking the cases, and above all HAVE FUN!