Spinning up and running Squid in Azure VM
Sometimes I need access to a proxy server, and in most cases the proxy should be located in a certain country or region. This is where all public cloud providers come in handy. In this blog article I’ll be spinning up and running Squid in Azure VM. Using Bicep template for automation to get rid of manual installation and configuration tasks.
First we’ll take a look of the overall architecture. Then we’ll dig into the template and provision the Azure resources. Finally we’ll test that the proxy works as expected.
Overall architecture
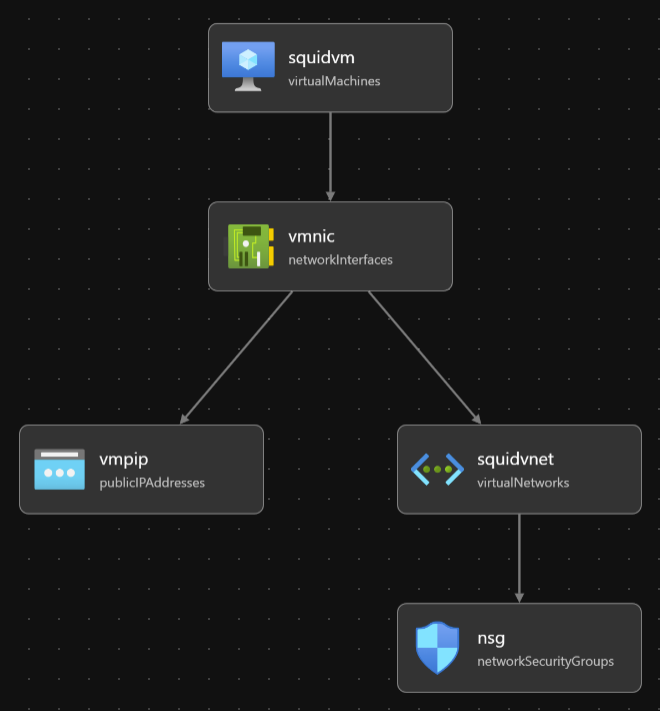
The overall architecture is really simple: an Azure VM in it’s own vnet, having a public IP and running squid for proxy needs :). This is how VS Code visualizes the template. Looks like the disk is not shown. Most probably because it’s defined inside the vm resource. It’s still there.
The deployment usually takes about 30 seconds, and it usually takes about the same 30 seconds to get squid up and running. So we should be good to go roughly in a minute. Before kicking off the actual deployment, let’s shortly have a look of the content of the template file, as I want to point out few things.
What’s in the template?
Oh, by the way, you can find the templates files from GitHub. There are five resources in the Bicep template.
resource vmpip 'Microsoft.Network/publicIPAddresses@2022-07-01'
resource vmnic 'Microsoft.Network/networkInterfaces@2022-05-01'
resource nsg 'Microsoft.Network/networkSecurityGroups@2022-05-01'
resource squidvnet 'Microsoft.Network/virtualNetworks@2022-05-01'
resource squidvm 'Microsoft.Compute/virtualMachines@2022-11-01'
Few notes about the resources. I’ve added a fqdn for the public ip, so that I can reuse the same fqdn and keep it stored in FoxyProxy browser extensions that I’m using.
So, let’s create the resources using az cli & bicep cli. Note that I’m using .bicepparam parameter files to pass necessary parameters. You need to be using Bicep CLI version 0.18.4 or newer with them. In the network security group’s security rules, I’m opening inbound ssh (22) and squid (3128) ports for my current public ip (I usually grab it with curl ifconfig.me). Feel free to remove ssh and/or change the squid port. (You’ll need to change http_port in the config too). Vnet is just a dummy one for the proxy.
For the virtual machine, I’m using one of the Ubuntu’s available, I’m attaching one of the ssh public keys I’ve [generated in Azure(https://learn.microsoft.com/en-us/azure/virtual-machines/ssh-keys-portal)]. customDatais where the magic happens. The value is a loooong string IyEvYmluL...XVpZA0K, and it’s a Base64-encode of the following bash script.
#!/bin/sh
apt update && apt upgrade -y && apt install -y squid

cat <<EOF | tee /etc/squid/squid.conf
http_port 3128
acl SSL_ports port 443
acl Safe_ports port 80
acl Safe_ports port 21
acl Safe_ports port 443
acl Safe_ports port 70
acl Safe_ports port 210
acl Safe_ports port 1025-65535
acl Safe_ports port 280
acl Safe_ports port 488
acl Safe_ports port 591
acl Safe_ports port 777
acl CONNECT method CONNECT
http_access deny !Safe_ports
http_access deny CONNECT !SSL_ports
http_access allow localhost manager
http_access deny manager
include /etc/squid/conf.d/*
http_access allow all
coredump_dir /var/spool/squid
refresh_pattern ^ftp:           1440    20%     10080
refresh_pattern ^gopher:        1440    0%      1440
refresh_pattern -i (/cgi-bin/|\?) 0     0%      0
refresh_pattern \/(Packages|Sources)(|\.bz2|\.gz|\.xz)$ 0 0% 0 refresh-ims
refresh_pattern \/Release(|\.gpg)$ 0 0% 0 refresh-ims
refresh_pattern \/InRelease$ 0 0% 0 refresh-ims
refresh_pattern \/(Translation-.*)(|\.bz2|\.gz|\.xz)$ 0 0% 0 refresh-ims
EOF

systemctl reload squid
systemctl enable squid
I strongly encourage you to decode the encoded string before going forward, as you should NEVER just run random scripts you found online. There are tons of ways to do that. I’m sure you’ll find a suitable way.
The script itself is really simple. We’ll first make sure we’re up-to-date, then installing and configuring squid, and finally making sure the new config is loaded. Note that I’m allowing anyone (http_access allow all) to connect to the proxy. I know this isn’t best practice, but in my use case I’m restricting the access with the nsg to just my public ip.
That’s it, let’s deploy the VM. I’ll be using UK South this time around. Note that I have removed the value of my public ip (param sourceAddressPrefix) from the parameters file. You need to input it in the parameters file. I’d be happy to pass it along with the deployment with an extra –parameters argument, but that doesn’t currently work with a .bicepparam file.
$ az login
$ az account set --subscription <subscriptionid>
$ az group create --name squid-test --location uksouth --tags owner=tommi@building4.cloud
$ az deployment group create --name squid-deployment --resource-group squid-test --template-file squid-vm.bicep --parameters squid-vm.bicepparam
That shouldn’t take too long. Give it a minute or so. We can test that everything works in many ways, I’ll take a shortcut and use curl.
$ curl ifconfig.me --proxy building4cloud-squid-test.uksouth.cloudapp.azure.com:3128
The response should match with the public ip we just created. Happy proxying!
Last words
In this article I demonstrated how to provision a squid proxy VM in Azure using Bicep. We took a quick look of necessary bit and pieces to get VM’s configuration in place using custom data. Finally we run a quick check that the proxy works as expeced.
Remember to delete all the created resources from Azure if you don’t need them! It’s also a sustainable act. No need to run stuff you don’t use them.