We're Live and Kicking in Azure Static Web Apps
Actually I think that the title should include one more word, finally. Anyways, the site is live and kicking! And in this post I’ll briefly explain how we got here.
Some time ago, I started kicking myself to butt in order to get on with the job in getting this site up and running. I had decided that I would be creating a static web site, so I started to look into my options. Like most of us do when searching for new information, I opened a web browser and started with a web search and then heading into Twitter to find some more.
It seemed that the popular choises were Gatsby, Hugo and Jekyll. With no particular reasons that I can think of, I decided to go with Hugo. Maybe I chose it because some of the persons I follow in Twitter are using it or maybe I bumped into an article where the recommended product for my use case was Hugo. Anyway, I chose to start with Hugo. Let’s move on.
First thing was to set up Hugo on WSL (just for the record, I ❤️ WSL). Well that was an easy task, downloading the release, uncompressing the binary and storing it in a PATH location. And we are done. Nothing else is needed.
I scrolled through the themes for some time and decided I wanted something light and easy, and decided to go with Kiera. After making the decision about the static website generator and a theme, it was time to get started. I followed the installation steps and got the site running locally. First win!
Few simple steps are all that’s needed to get started. Creating a new site, initializing a git repo, adding theme and commiting changes:
hugo new site building4
cd building4
git init
git submodule add https://github.com/funkydan2/hugo-kiera.git themes/hugo-kiera
echo 'theme = "hugo-kiera"' >> config.toml
git add -A
git commit -m "initial commit"
After creating a blank repo in GitHub, all that is needed is to push the local repo up to GitHub.
hugo new site building4.cloud
git remote add origin https://github.com/tmarjomaa/building4.git
git push -u origin master
You have probably at least read, if not participated, in recent discussions to move away from master branch. Here’s how you can rename master branch to main.
git branch -m master main
git push -u origin main
I wanted to make some customizations to the theme and it took a while (or two, and maybe even some more) to get some understanding how Hugo works. After reading the documentation and various conversations, I was able to make the small customizations I was looking for. Because I needed to make some changes to the layout, I had to find a way to override the ones included in the theme. In the end all I needed was to find out the partial template lookup order. Another win!
After some struggles with selecting the generator and themes, it was easy to select where to host the site. As I’m working daily with Azure, there were no questions about the hosting platform. Originally I was planning on building a CI/CD pipeline with Azure Pipelines. But when Microsoft introduced Azure Static Web Apps Preview, I was sold. The preview service is lacking some features, but getting started is ridiculously easy. It will even create Github Actions workflow for you. So every time I create a new post or make any other change, all I need to do to get it updated in the website is git push. Everything else is done for me.
Once the code is pushed to GitHub, it’s time to provision a new Static Web Apps and deploy the website. At the time the only way to do it is through Azure Portal. Basically I followed the instructions in Microsoft docs.
Note! In case the branch name is not master, correct branch needs to be selected.
After making sure GitHub Actions pipeline was working and the site was working with it’s azurestaticapps.net URL (https://zealous-sky-0fbad1c03.azurestaticapps.net), it was time to set up custom domain. Unfortunately root domain support is not available during preview, but there is a excellent blog post, which explains how Cloudflare’s free plan can be used to configure root domain for Static Web App.
As I didn’t have Cloudflare account, first thing was to sign up. I used buliding4.cloud as the site and chose Free tier. After initial setup, Cloudflare presented me with two name servers. I happened to have the same domain registrar (Namecheap) as in the blog post, so it was a breeze to get that part done. All I did was change building4.cloud’s nameservers from default to custom DNS and entered the name servers which I got from Cloudflare.

Then back to Cloudflare to setup CNAMEs, one for www and one for root domain.

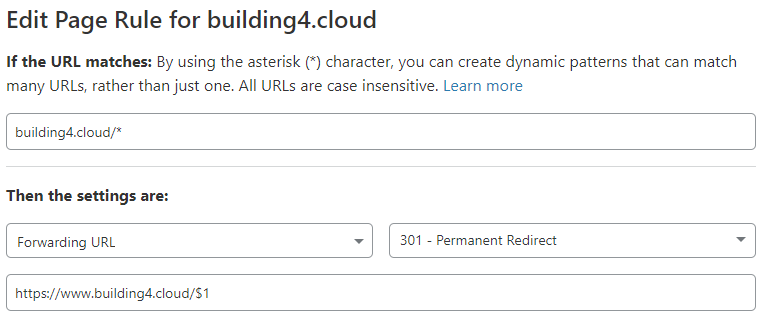
One more thing was necessary, creating a new page rule. It is needed to make sure all paths are redirected correctly. The $1 appends anything after .cloud to the redirect.

After making these changes it was time to grab some coffee and wait for the DNS changes to propagate worldwide. After a cup of coffee, I was able to verify my custom domain for the static web app and start browsing the site with https://bulding4.cloud. Yes, that’s https not http. And in case you are thinking… Hey, wait a minute, when did you upload a certificate for the site? I didn’t. There’s no need for that, Static Web Apps offer free SSL certificates, which are even automatically renewed. So easy.
That’s how building4.cloud got currently running in Azure’s Static Web Apps and we have reached the end of this post.
Until next time, take care.